
Tuesday, October 23, 2012

GET READY FOR HALLOWEEN - DUCT TAPE PUMPKINS


I Love creativity! How easy and fun to do with just a little of imagination, duct tape and the creativity of Casey and Bobi Jensen.
Tuesday, October 9, 2012
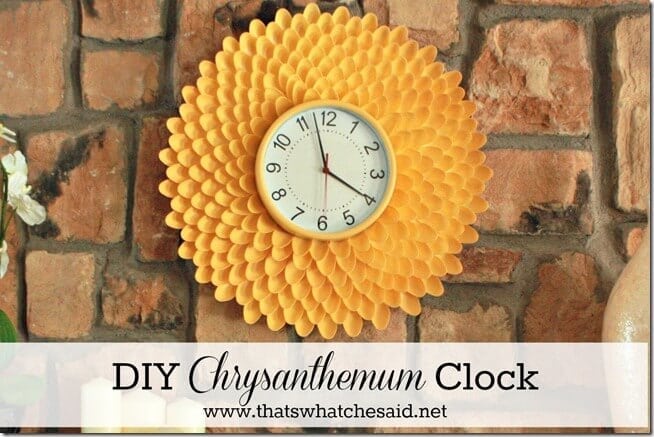
DIY CLOCK FROM PLASTIC SPOONS

Items Needed:
- Plastic Spoons (I used roughly 250)
- Scissors
- Hot Glue Gun/Glue Sticks
- Foam Board
- A clock (I bought a cheapy!)
- (2) 1” screws or longer, philips screwdriver
- Xacto Knife
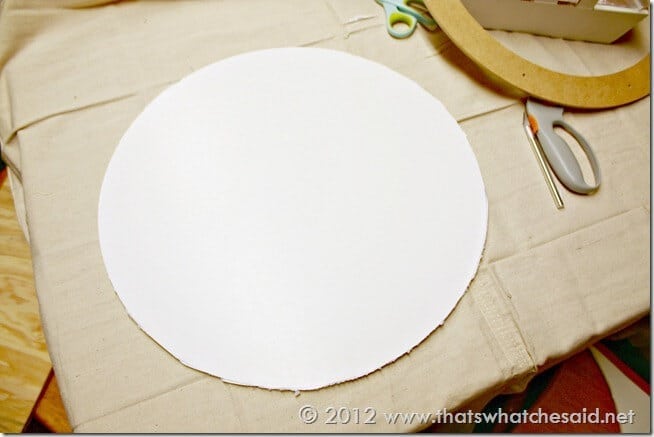
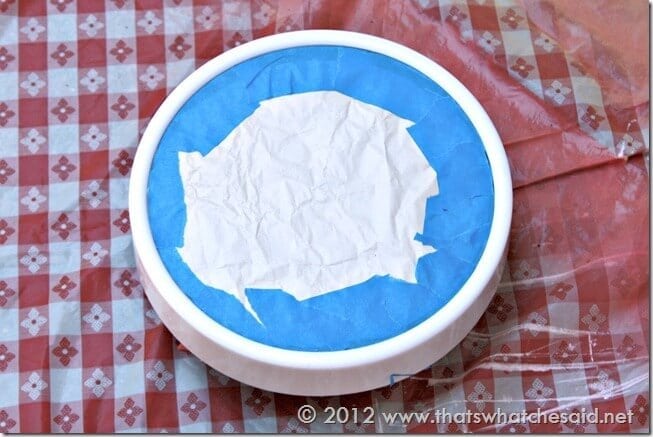
1. She started off by cutting my base out of foam board. I used foam board because 1. It’s light, 2. I had some already in my stash and 3. it’s cheap! I traced an 18” wreath form. I cut it out using a combination of Xacto knife and scissors. Save some scraps for later!
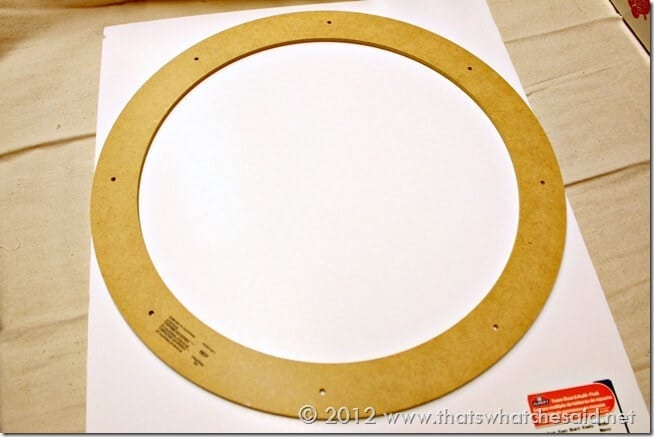
2. Found the center of the circle, and placed my centered my store bought clock and traced around it so I would have an idea of how far to come down with my spoons.
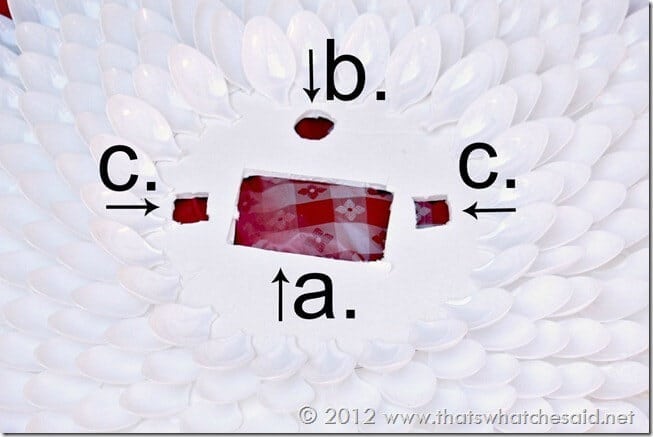
3. Then duplicated four things/areas from the back of my clock onto my foam board.
a. The center rectangle for the battery compartment (you will need a way to change/insert batteries to your clock)b. The circle at the top to hang your clockc. The two holes on each side (3 and 9 positions) where the clock was fastened onto the original cardboard packaging. These spots you will use to fasten your foam board to the clock!
4. (Next I wish I had spray painted the foam board at this point. I did not. Learn from me and spray paint your foam board! )
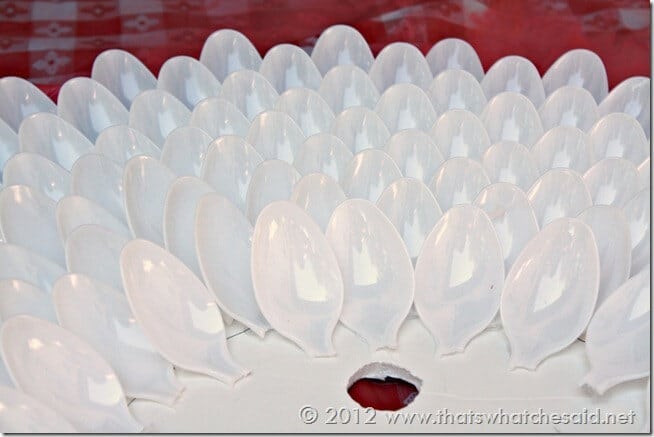
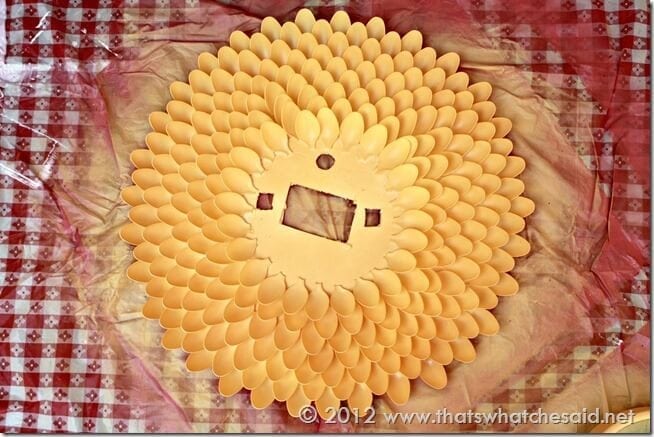
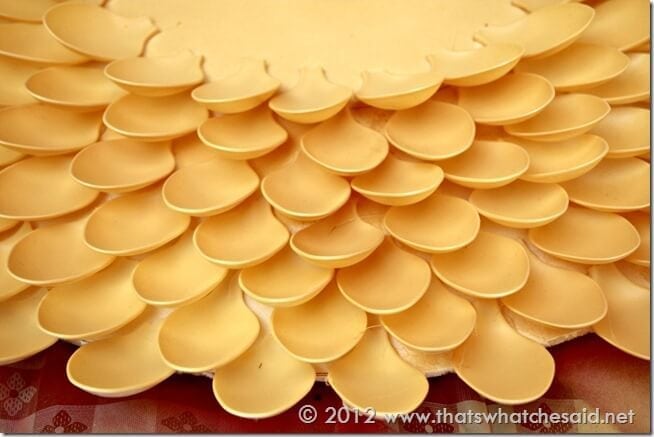
5. Cut your spoons! I used regular scissors. After a few you find the “sweet spot” on the spoon where they cut really nicely! Don’t worry if some of the handle is still on there, it will all get covered!
6. I did a quick trial run and just placed the spoons (without glue) in a small section so I could get a hang of the spacing needed and the number of layers to fill the area.
4. Start spacing out your outside ring and get gluing. Hot glue works great, dries fast and holds the spoons on the foam board nicely! Continue until you have all the area covered, overlapping your line you previously drew to outline the clock!
5. Next I covered the face of the clock with paper and painters tape. I didn’t want a white clock and a yellow flower so I needed to spray the clock yellow also. (an Xacto knife works well here to trim the tape perfect with the curve of the outside rim of the clock)
5. After all my spoons were glued and clock face was protected, I took them outside and gave each some light, even coats of Yellow spray-paint.
6 After that dried I brought it inside and then cut two small squares out of some scrap foam board that I saved from step 1. I cut the squares larger than the holes I cut at the 3 and 9 position. So your measurements will depend on the size of holes you cut.
7. I used a 1” screw to go through the small square piece, through the openings I cut and directly into the back of the clock where it had been originally screwed to the store packaging. Snug as a But in a Rug!
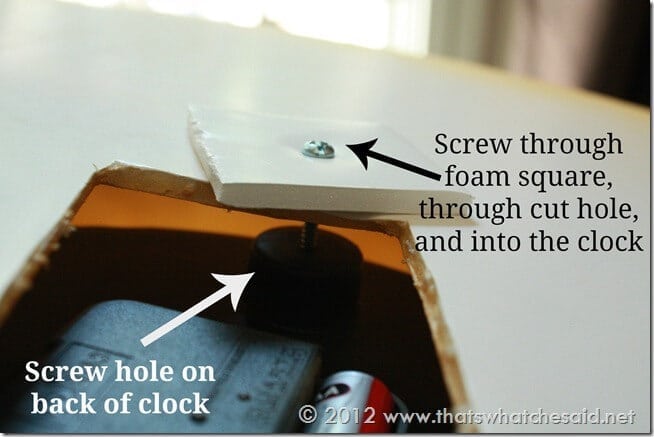
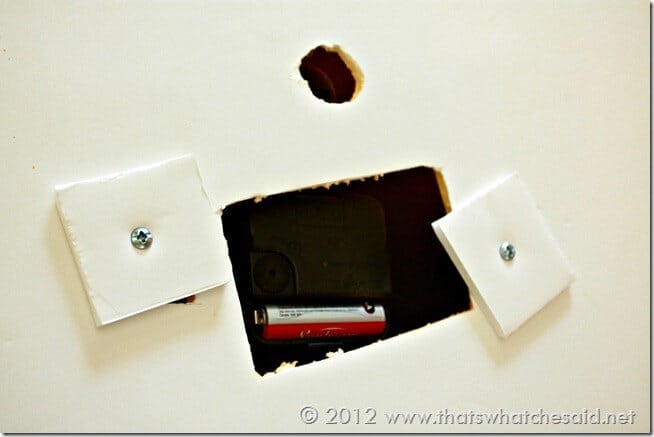
Note: You might wonder why I cut holes for the screws (3 and 9 positions) rather than just pushing the screw through the foam board on the clock (like I did for the small squares). The reason is that the clock sits on top of part of the spoons on the front, so the larger holes gave me wiggle room to get the clock centered and made it MUCH easier to get an exact location on the screw holes located in the back of the clock!
8. Pop in a battery and set the time! Hang and enjoy your fun new clock!
I hung mine in several places but I think it will stay here…for now! It adds a nice pop of color to my very neutral, rustic fireplace!
I love this project. She is very creative and like very much how good she explain all the steps
to achieve such a great project!
to achieve such a great project!
IT GETS BETTER PROJECT
- On September 21, 2010, Dan Savage and his partner, Terry, posted a message on YouTube for LGBT teens everywhere facing harassment. The message was simple: "It gets better. However bad it is now, it gets better." The video was just a small response to a series of bully-induced suicides by LGBT youth. Dan wanted to reassure LGBT teens everywhere that life does, in fact, get better, and more often than not, life can get great.
Since then, The It Gets Better Project has turned into a worldwide movement, inspiring politicians, celebrities, organizations, activists, and personalities alike to submit their own story. From President Barack Obama to funny girl Sarah Silverman, everyone has put out their own message of hope.
Now, it's MTV's turn to add to the movement with the It Gets Better special, a reminder to teens across the country that it will get better, and we're standing right by them until it does.
Check Out itgetsbetter.org
BE CRAFTY FOR HALLOWEEN.
She turned these

Into this:

...and into this

Into this:
...and into this

Where she found the supplies:
candlesticks - Michaels, 2.99 each
round base - any craft store, .50
letters - Hobby Lobby, .99 each
Glass Jar - Hobby Lobby, 2.99 each
Finial - .99 each or knob - bag full for 2 dollars or so at any ol' craft store
ribbon - any craft store, about 2 dollars
paint - my paint bin, free
(about 20 dollars to make all three and just over a half hour. I didn't have any coupons or sales and was not patient enough to wait for them, you could do it for quite a bit less if you did.)
I used hot glue for all parts excepts to adhere the glass onto the
candle stick and then I used super glue GEL.
By See Jane Blog
LA FILOSOFIA DE VIDA DE STEVE JOBS EN 10 FRASES
1. "Una computadora es para mí la herramienta más notable que jamás hayamos presentado. Es el equivalente a una bicicleta para nuestras mentes." (Película Memoria y la Imaginación, 1990)
2. "Yo no terminaré comprando un montón de cosas, porque me parecen ridículas". (The Independent 2005,)
3. "Creo que la muerte es el invento más maravilloso de la vida. Ella purga el sistema de estos modelos antiguos que han quedado obsoletos". (Playboy, 1985)
4. "La gente piensa que enfocarse significa decir sí a lo que te tienes que enfocar. Pero no signfica eso en lo absoluto. Significa decir no a las cien otras ideas buenas que hay. Tienes que escoger con cuidado. Estoy tan orgulloso de las cosas que no hemos hecho como las cosas que he hecho. Innovación es decir no a 1,000 cosas". (Conferencia Mundial de Desarrolladores de Apple, 1997)
5. "Ser el hombre más rico del cementerio no me importa .... Ir a la cama diciendo que hemos hecho algo maravilloso es lo que me importa". (CNNMoney/Fortune, 1993)
6. "Mi trabajo no es ser agradable con la gente. Mi trabajo es hacerlos mejores". (CNNMoney/Fortune, 2008)
7. "Si quieres vivir tu vida de una manera creativa, como artista, no tienes que mirar demasiado hacia atrás. Tienes que estar dispuesto a tomar lo que has hecho y el que eras y tirarlo a la basura". (Playboy, 1985)
8. "La innovación distingue entre un líder y un seguidor." (Los secretos de innovación de Steve Jobs, 2001)
9. "Mi modelo de negocio son los Beatles eran cuatro chicos que mantenían entre sí las tendencias negativas en jaque, ellos se equilibraban entre sí, y el total era mayor que la suma de las partes. Así es como yo veo los negocios. Las grandes cosas en los negocios nunca se realizan solo por una persona, se realizan por un equipo de personas". (60 Minutes, 2003)
10. "Yo cambiaría toda mi tecnología por una tarde con Sócrates." (Newsweek, 2001)
Subscribe to:
Posts (Atom)